A fish made out of found materials.

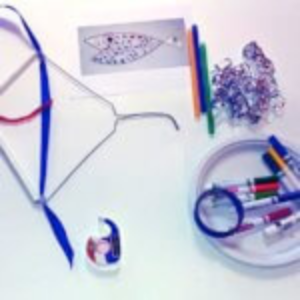
Art Activity Video: Alexander Calder

Create a fish mobile inspired by Alexander Calder!
Activity best for children age 3 and up

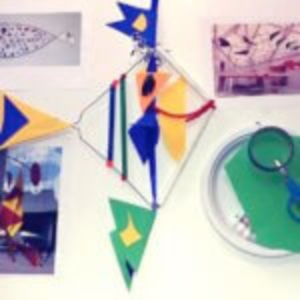
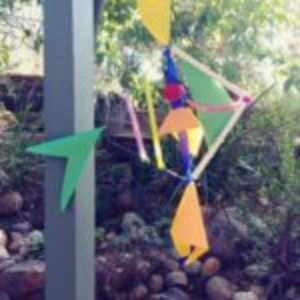
Alexander “Sandy” Calder grew up in a family of artists. His grandfather and father were sculptors and his mother was a painter. Sandy was interested in movement and how people jumped, flew, swam, trotted or crawled. For him, they were all artistic shapes that never stayed in the same place. He invented a whole new way of making sculpture called “Kinetic Art.” His friend, Marcel Duchamp called the sculptures that moved in the air above you “mobiles” and sculptures that appeared to be moving but were anchored to the ground, “stabiles.”

Today you will make a  Calder inspired “Finny Fish” mobile. Think of the shapes of a fish and what they need to move, and you and your fish are well on your way!

MATERIALS

  • Colored paper

  • Wire hanger with paper rod

  • Thin ribbon or string

  • Pipe cleaners

  • Straws, shells with holes in them, beads, bottle caps, etc.

  • Tape

  • Glue stick

  • Scissors

DIRECTIONS

STEP 1

Take the looped end of your hanger in one hand and the paper rod side in the other and gently pull in opposite directions until the wire stretches and the rod folds in the middle of the paper. you will see a diamond shaped  “Fish” appear. Don’t pull too hard! The front is where the paper rod is bent. The wire loop in the back is where the tail will go.

A hanger bent to make a diamond shape.

STEP 2

Tie a long piece of string or ribbon to your fish where the paper rod and the wire meet That is where the head will be. Have your string be longer than the fish’s body below the head. You will need it to tie a knot where the paper rod and wire meet at the bottom of the fish. Leave some extra string to tape a fin on.

A string tied to the diamond shaped hanger.

STEP 3

Take a pipe cleaner or make a paper smile for your fish, one for each side. Tape or wind around the point where the paper rod is bent. Alexander Calder liked circles and triangles. You can use a bottle cap or cut out a circle or triangle for your fish’s eyes. Tape one to both sides of the string or ribbon.

A pipe cleaner looped on to form a smile for the fish.

STEP 4

Cut two large triangles from a piece of colored paper. Glue them together over the looped wire in the back to create the tail.

Paper cut into a triangle shape and attached to the wire fish to form the tail.

STEP 5

To create the fins, cut two paper triangles. It’s okay if they are uneven! Fold a corner of each triangle and tape it below the eyes on both sides of your fish. Cut two more large triangles. Fold them in half and tape them to the bottom and top of the fish where you have the extra ribbon or string.

Fins created out of two cut triangle pieces of paper.

STEP 6

Your beautiful “Finny Fish” is ready to hang in the breeze! Test it “swimming” outside or your room! It may need more weight in the front or back to keep it from falling forward or back. Use your extra pipe cleaners, straws, paper, and tape to create balance. You can cut away part of a shape too.

The completed wire fish hanging up outside.